How to Hang and Install Lighting
Adding a new light fixture is an easy home update and instantly freshens up your space. You may open the box to see the parts bags and wires, then wonder what you got yourself into as a self-proclaimed DIY-er. But we’re here to tell you that you can keep your DIY title. Installing and hanging a light fixture is something that even a beginner can handle.
Time needed:
1 - 2 hours
Skill Level:
DIY Friendly
Cost:
Ranges
The following lighting installation guide from Hunter should help you navigate the basic process of how to install a light fixture, including hanging the light at the proper height, ensuring proper light wiring, and more. As you follow our lighting installation guide, keep the following in mind:
- The included videos and instructions within this guide generally apply to the installation of most Hunter light fixtures. However, the directions for your specific model may differ slightly.
- This guide should only be used as supplemental material to the model-specific lighting manual included with your purchase of a Hunter light fixture.
- Always refer to your manual for the most accurate instructions for installing your light fixture.
- If your manual has been misplaced, you can easily find and download the model-specific manual for your Hunter light fixture on our website.
- Alternatively, you can hire a certified, professional electrician to install your light fixture.
Table of Contents
- 1. How high should you hang lights?
- 2. How far apart should you hang pendant lights?
- 3. How to uninstall and remove an existing light fixture
- 4. How to hang and install pendant lights
- 5. How to install a wall sconce
- 6. How to install vanity lights
- 7. How to install a chandelier
- 8. How to install flush mount lights
- 9. How to install cluster pendant lights
01.
How high should you hang lights?
Before getting started on the installation process, it's important to know how high to hang a light fixture. Whether you're hanging pendant lights over an island, wondering how high to hang a chandelier, or trying to install a bathroom vanity light or sconce on a wall, there are some general rules of thumb to learn.
PRO-TIP: If you're a visual person, hang a balloon from a string and tape it to the ceiling or wall where you’re planning to hang your light to help determine the measurements you need. Remember to account for the fixture size when finalizing how many downrods or how long of a chain your light needs.
Here are some general guidelines for how high your pendant light(s), chandelier, sconce, or vanity light should hang:
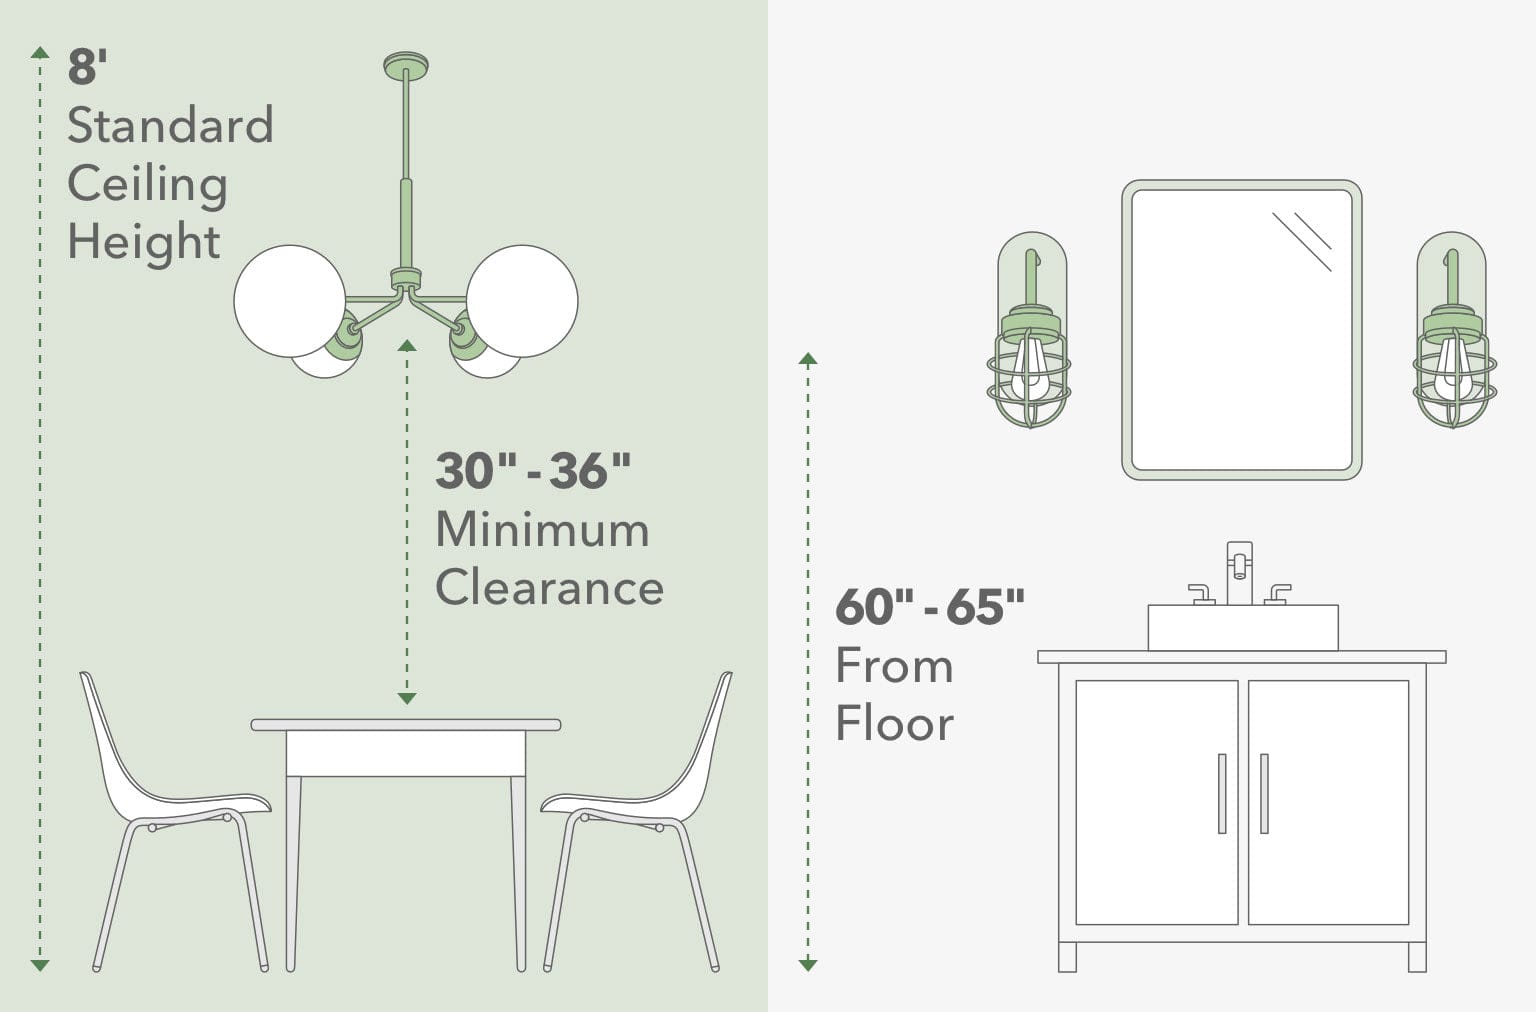
01. How high to hang pendants and chandeliers
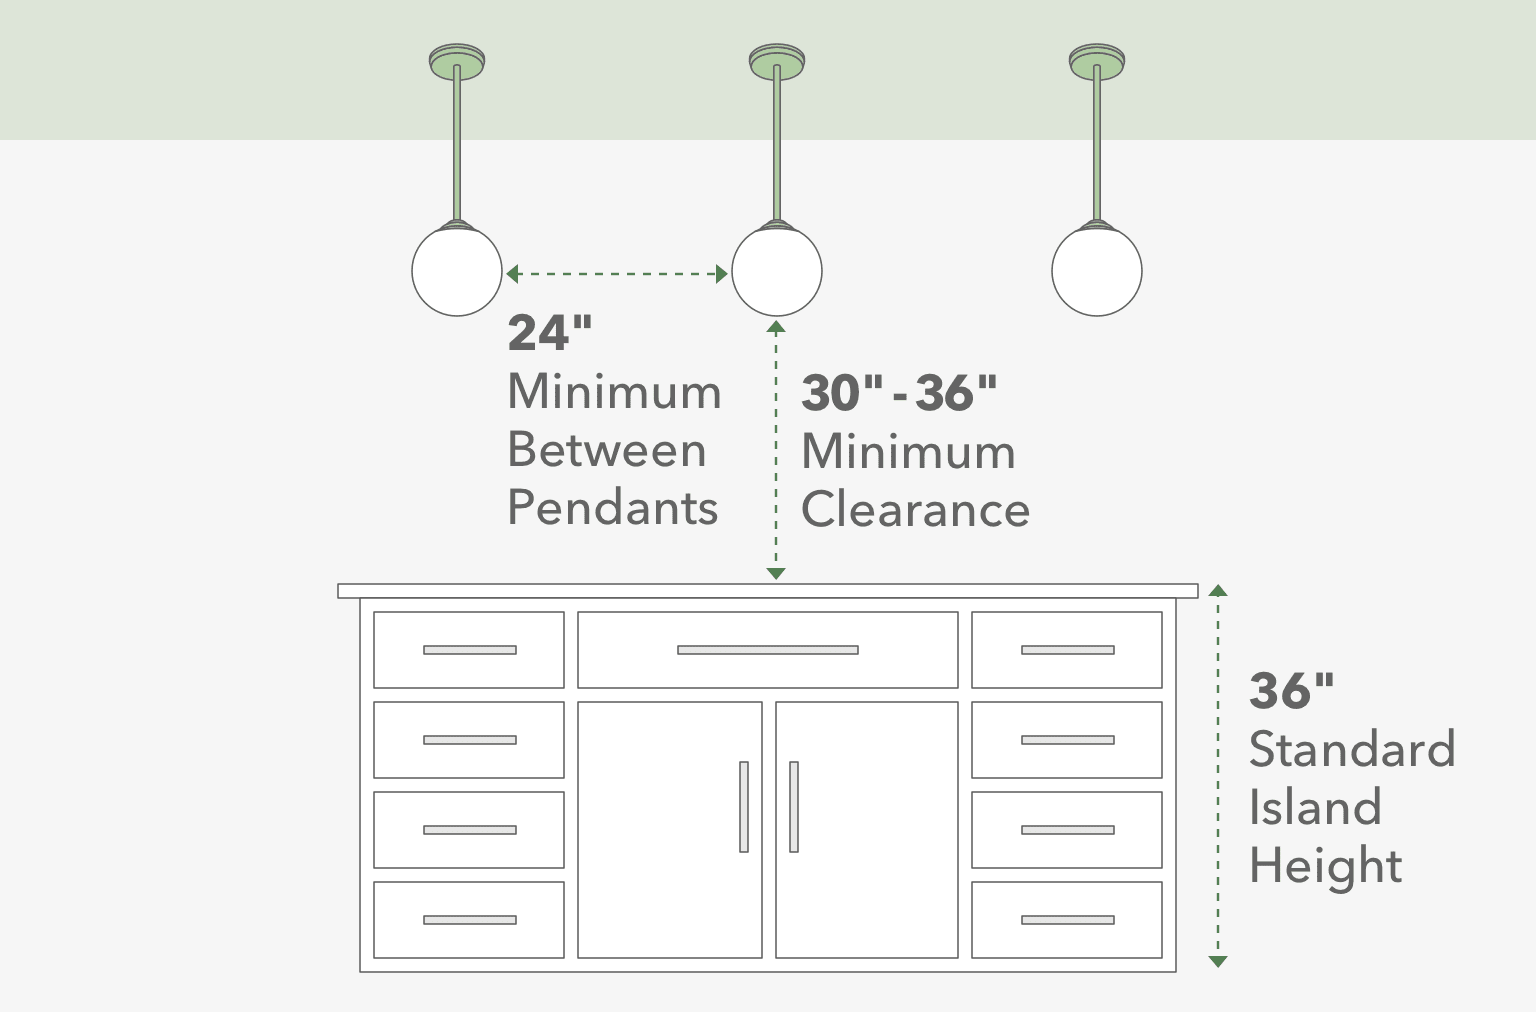
Pendants and chandeliers need at least 30- to 36-inch minimum clearance from the bottom of the light shade to the top of the surface it's hanging above. When working with pendant fixtures, that may mean hanging the lights over a kitchen island or bar.
You can also use these estimates for hanging a chandelier over a dining table. If you want to hang your chandelier in a foyer or entryway, make sure the bottom of the fixture is a minimum of seven feet from the ground. For two-story homes, the fixture will hang significantly higher.
02. How high should wall sconces be hung?
Hang wall sconces 60 to 65 inches from the floor and 24 to 30 inches from the countertop. Most homes come with junction boxes at these heights; if you need junction boxes installed, use these guidelines as you consult a professional electrician.
03. How high to hang bathroom vanity lights
It's easy to choose a vanity light height when your bathroom already has mirrors – simply hang the vanity lights right above the top of the mirror. The average bathroom vanity light height usually comes to about 75 to 80 inches off the ground.
Ultimately, the height you hang a light fixture is a matter of personal style as well as your space’s layout (you don’t want your new kitchen island lighting to block people’s views when they’re sitting at the counter).
02.
How far apart should you hang lights?
01. How far apart to hang pendant lights and chandeliers
When hanging multiple pendant lights, you should leave a minimum of 24 inches between each fixture. Remember to account for the width of the pendant light fixtures when mapping out the distance between pendant lights in your space. If you’re hanging multiple pendant lights of various heights in a cluster formation, then you can place them closer together.
You may choose to hang multiple chandeliers to fill large, open areas like foyers or grand entryways, or to light both ends of a long dining room table. In these cases, the space between the chandeliers should be approximately the same as the width of the fixtures.
02. How far apart to hang wall sconces
Some places where you hang wall sconces, like on the sides of doors and windows, will already have the distance in between the fixtures pre-determined. In other areas, like long hallways or staircases, you’ll need to decide how far apart to hang the sconces. Generally, you should leave at least six feet between each sconce, but that estimate is flexible depending on your space.
03. How far apart to hang vanity lights
Bathroom vanity lights typically come in rows with the individual bulbs equally distanced, so you can hang a single light fixture over a mirror. If you have two or more mirrors, you’ll want additional vanity fixtures. The distance between the vanity lights will be determined by the mirror location, but there are multiple options for the ways you can install bathroom vanity lights.
04.
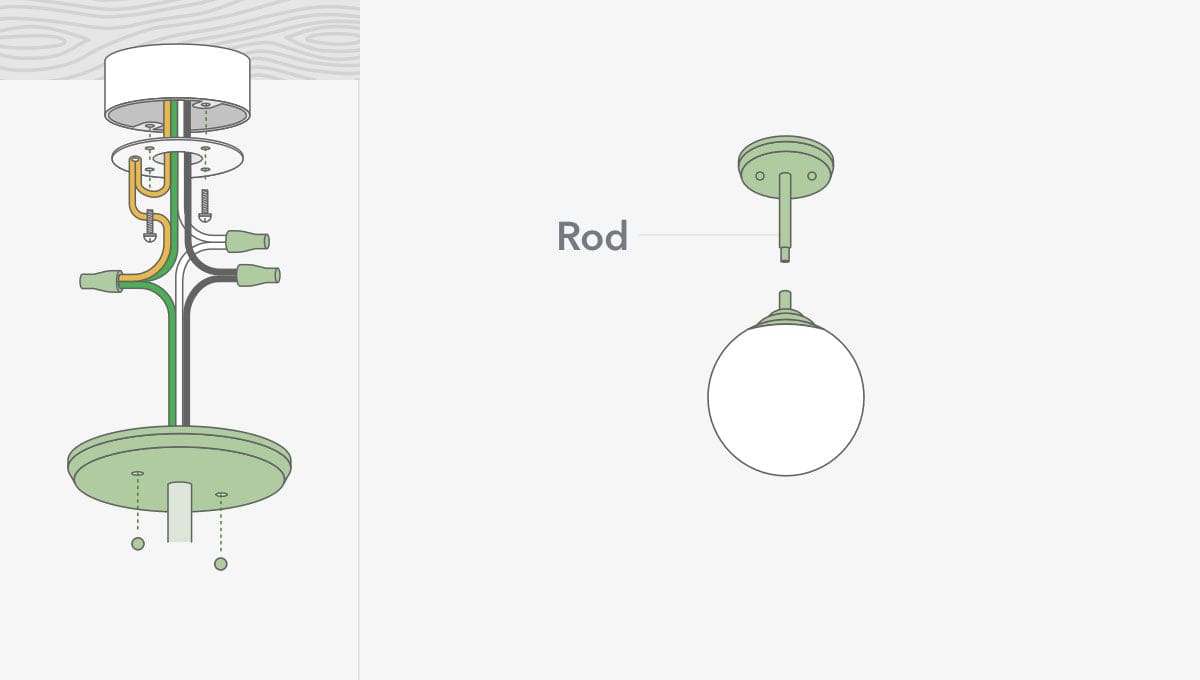
How to hang and install pendant lights
With any pendant light, you’ll want to take the old light fixture down and everything that comes with it. Everything. It's important to use the new mounting bracket that comes with your new pendant light. You also need know how long your fixture should hang so you can use the appropriate number of downrods or chain links and trim the excess wires accordingly. Reference back to the graphics above for ideal pendant heights.
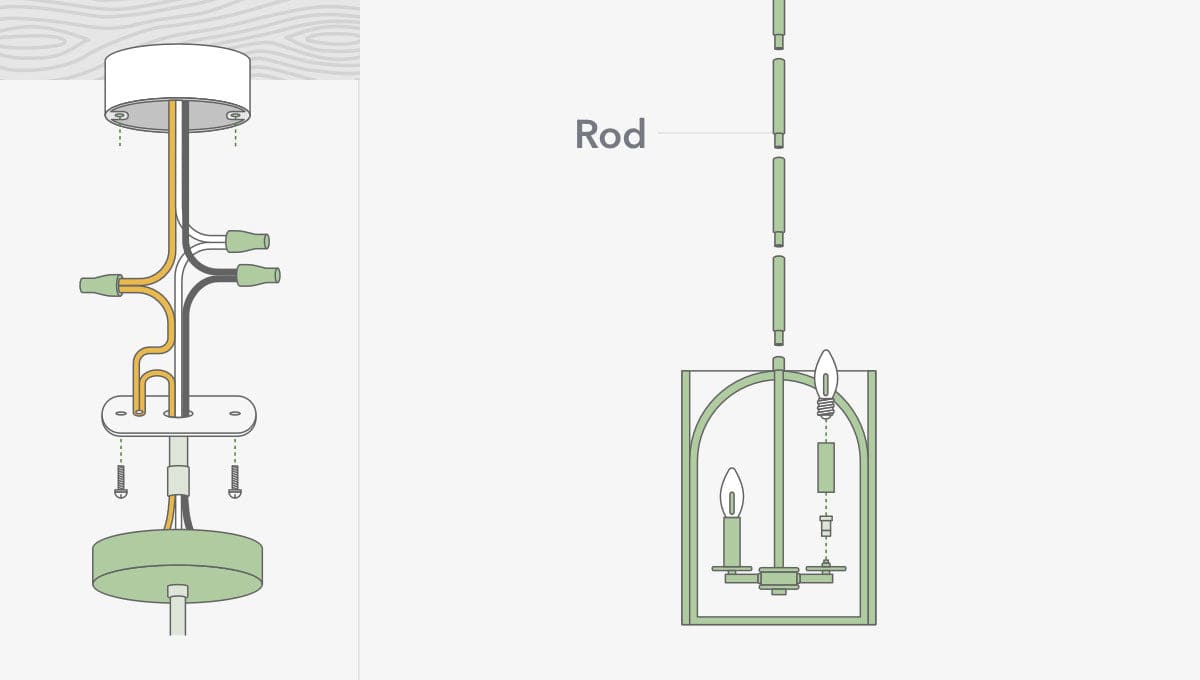
How to install a pendant light with a downrod
Remember to safely uninstall and remove existing light fixtures and mounting brackets first (see the related section at the top of this page). The below steps are a general guide for how to install your pendant light with downrods; always refer to your specific fixture’s manual for detailed instructions.
01. Assemble the fixture, starting by feeding the wires through the downrods and connect the downrods together as well as to the fixture.
Twist the wires together or use electrical tape to feed the wires through the rods.
02. Rest the canopy ring followed by the canopy on the downrods.
03. Thread the mounting bracket assembly on the downrod.
04. Secure the mounting bracket to ceiling.
05. Trim any excess wiring. Then, use the included wire nuts to twist and connect the wires from the junction box to the fixture wires:
- Black to black (live wires)
- White to white (grounded)
- Grounding wire to grounding wire (these are usually green or copper)
- Secure the wire connections inside the junction box.
06. Lift the canopy over the wires so it’s flush with the ceiling, then tighten the canopy ring.
07. Add the finishing touches, making sure you have all the necessary accessories like votive covers and glass shades.
08. Be sure to use bulbs that do not exceed the maximum wattage listed on the socket.

How to install a pendant light with a chain
Remember to safely uninstall and remove existing light fixtures and mounting brackets first (see the related section at the top of this page). The below steps are a general guide for how to install your chain pendant light; always refer to your specific fixture’s manual for detailed instructions.
01. Secure the canopy loop ring to the mounting bracket, then secure the mounting bracket to the junction box.
02. Open and remove the extra chain links using a pair of pliers.
03. Use one of the chain connectors to attach the chain to the top loop of the fixture.
04. About every three links, feed the fixture wires through and up the chain. Pull until the wires are taut.
The chains support the weight of the light fixture. Make sure they’re securely connected to the fixture and mounting system. The wires should never bear the weight of the fixture.
05. Slide the canopy ring and canopy over the wires and chain.
06. Use another chain connector to attach the chain to the canopy loop ring on the ceiling.
07. Use the included wire nuts to twist and connect the wires from the junction box to the fixture wires:
- Black to black (live wires)
- White to white (grounded)
- Grounding wire to grounding wire (these are usually green or copper)
- Secure the wire connections inside the junction box.
08. Loop the fixture’s grounding wire around the grounding screw, then tighten the screw.
09. Lift the canopy over the wires so it’s flush with the ceiling, then tighten the ring.
10. Add the finishing touches, making sure you have all the necessary accessories like votive covers and glass shades.
11. Be sure to use bulbs that do not exceed the maximum wattage listed on the socket.

01. Secure the mounting bracket to the junction box.
02. Use the included wire nuts to twist and connect the wires from the junction box to the fixture wires:
- Black to black (live wires)
- White to white (grounded)
- Grounding wire to grounding wire (these are usually green or copper)
- Secure the wire connections inside the junction box.
03. Loop the fixture’s grounding wire around the grounding screw, then tighten the screw.
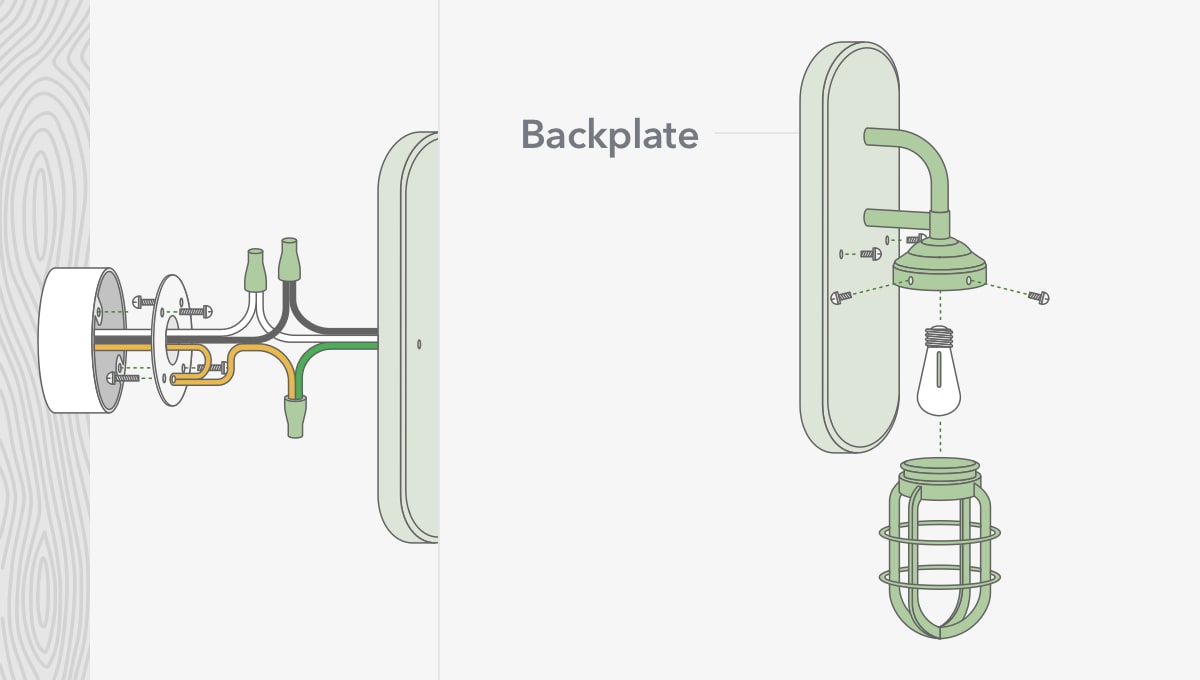
04. Attach the fixture’s backplate to the mounting screws, using the decorative cap nuts to secure it. The backplate should fit snug to the wall.
05. Add the finishing touches, making sure you have all the necessary accessories like votive covers and glass shades.
06. Be sure to use bulbs that do not exceed the maximum wattage listed on the socket.
06.
How to install vanity lights
Vanity lighting can give you multiple lights above your counters while only using one junction box in the wall. Whether you have a two-light vanity light or one with four lights, you’ll need to remove everything from the previous light fixture and use the mounting plate that comes with your new fixture (see the related section at the top of this page). The below steps are a general guide for how to install your vanity light; always refer to your specific fixture’s manual for detailed instructions.
01. Pull the house wires through the center of the mounting plate and secure the plate to the junction box.
02. Have someone help hold the vanity light while you use the included wire nuts to twist and connect the wires:
- Black to black (live wires)
- White to white (grounded)
- Grounding wire to grounding wire (these are usually green or copper)
- Secure the wire connections inside the junction box.
03. Loop the fixture’s grounding wire around the grounding screw.
04. Slide the fixture’s backplate over and through the mounting screws. Secure with the decorative cap nuts.
05. Add the finishing touches, making sure you have all the necessary accessories like votive covers and glass shades.
06. Be sure to use bulbs that do not exceed the maximum wattage listed on the socket.
07.
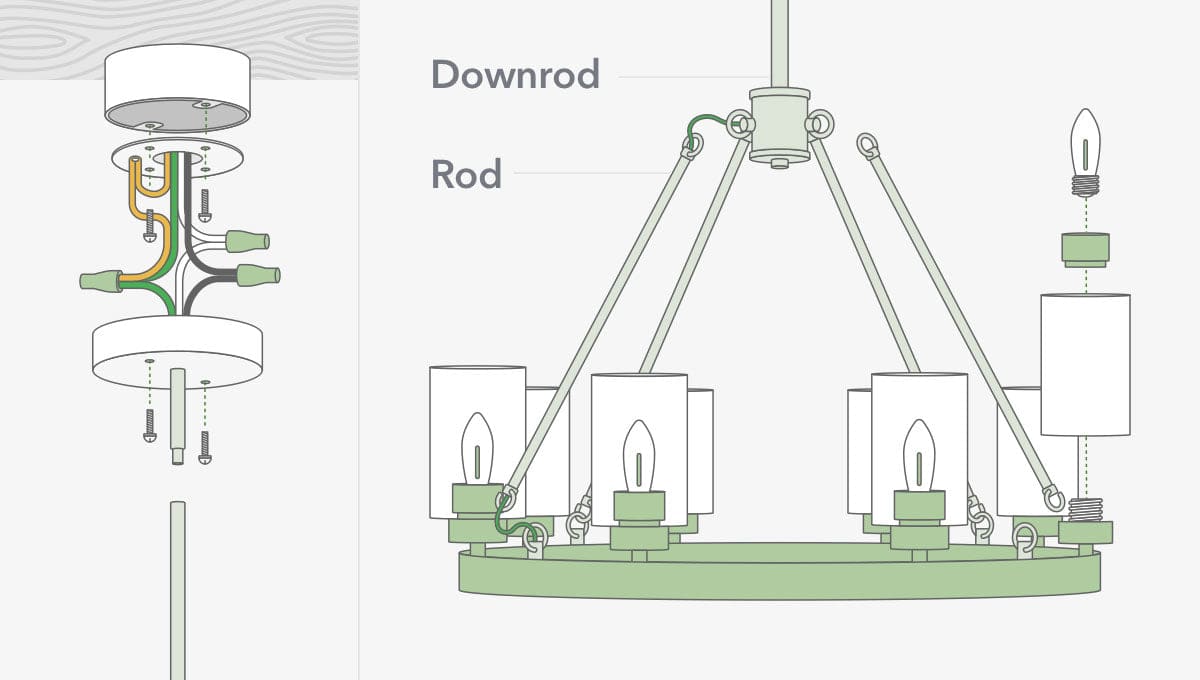
How to install a chandelier
A big light fixture means more installation steps. But don’t let that intimidate you when installing a chandelier! It’s all still doable for DIY novices. Of course, if you ever do get uncomfortable installing a chandelier, consult a certified, professional electrician.
How to install a linear chandelier
Remember to safely uninstall and remove existing light fixtures and mounting brackets first (see the related section at the top of this page). The below steps are a general guide for how to install your chandelier; always refer to your specific fixture’s manual for detailed instructions.
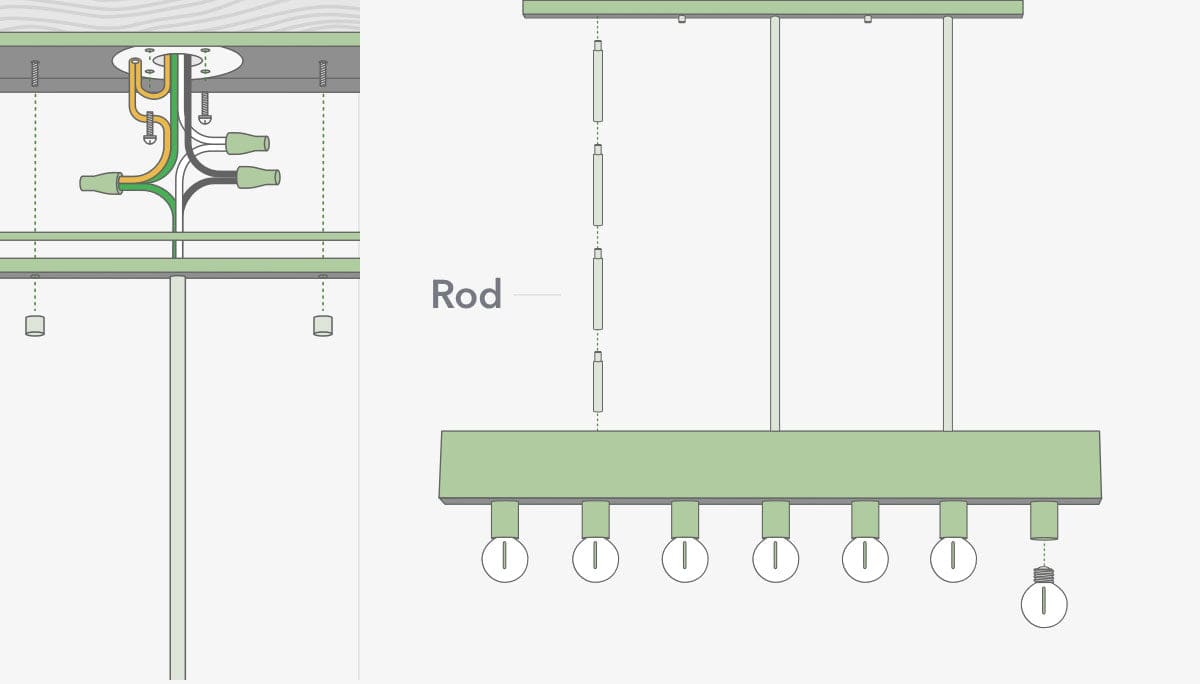
01. Secure mounting plate to the junction box. You may need to drill pilot holes; check your specific fixture’s manual for detailed instructions.
02. Assemble the fixture, starting by feeding the wires through the downrods and connect the downrods together as well as to the fixture.
Twist the wires together or use electrical tape to feed the wires through the rods.
03. Rest the canopy rings then the canopy on the downrods.
04. Place the reinforcing plate into the canopy. Secure the plate and canopy to the downrods’ threaded posts using the included wingnuts.
05. Trim the fixture wires leaving 8 to 10 inches remaining from the top.
06. Have someone help hold the chandelier while you use the included wire nuts to twist and connect the wires:
- Black to black (live wires)
- White to white (grounded)
- Grounding wire to grounding wire (these are usually green or copper)
- Secure the wire connections inside the junction box.
07. Loop the fixture’s grounding wire around the grounding screw.
08. Raise the fixture so the canopy holes and the mounting screws in the mounting plate align. Use the decorative cap nuts to secure the canopy to the mounting plate.
09. Add the finishing touches, making sure you have all the necessary accessories like votive covers and glass shades.
10. Be sure to use bulbs that do not exceed the maximum wattage listed on the socket.
How to install a round chandelier
Remember to safely uninstall and remove existing light fixtures and mounting brackets first (see the related section at the top of this page). The below steps are a general guide for how to install your chandelier; always refer to your specific fixture’s manual for detailed instructions.
01. Feed the wires through the downrods and connect the downrods together as well as to the fixture.
Twist the wires together or use electrical tape to feed the wires through the rods.
02. Rest the canopy ring then the canopy on the downrods.
03. Thread the mounting bracket assembly on the downrods.
04. Attach the mounting bracket to the junction box on the ceiling.
05. Cut the excess wire, leaving 8 to 10 inches of wire coming out of the last downrod.
06. Use the included wire nuts to twist and connect the wires:
- Black to black (live wires)
- White to white (grounded)
- Grounding wire to grounding wire (these are usually green or copper)
- Secure the wire connections inside the junction box.
07. Loop the fixture’s grounding wire around the grounding screw and tighten.
08. Fit the canopy flush to the ceiling, then secure it with the canopy loop ring.
09. Add the finishing touches, making sure you have all the necessary accessories like votive covers and glass shades.
10. Be sure to use bulbs that do not exceed the maximum wattage listed on the socket.
Some round chandeliers include rods connecting the chandelier to a central hook on the fixture, then downrods connecting the entire fixture to the ceiling. You’ll need to feed the wires through one rod, the fixture hook, then through the downrods. It’s an extra step, but we have confidence in your skills. (If you don’t, you can always call on a certified, professional electrician.)
08.
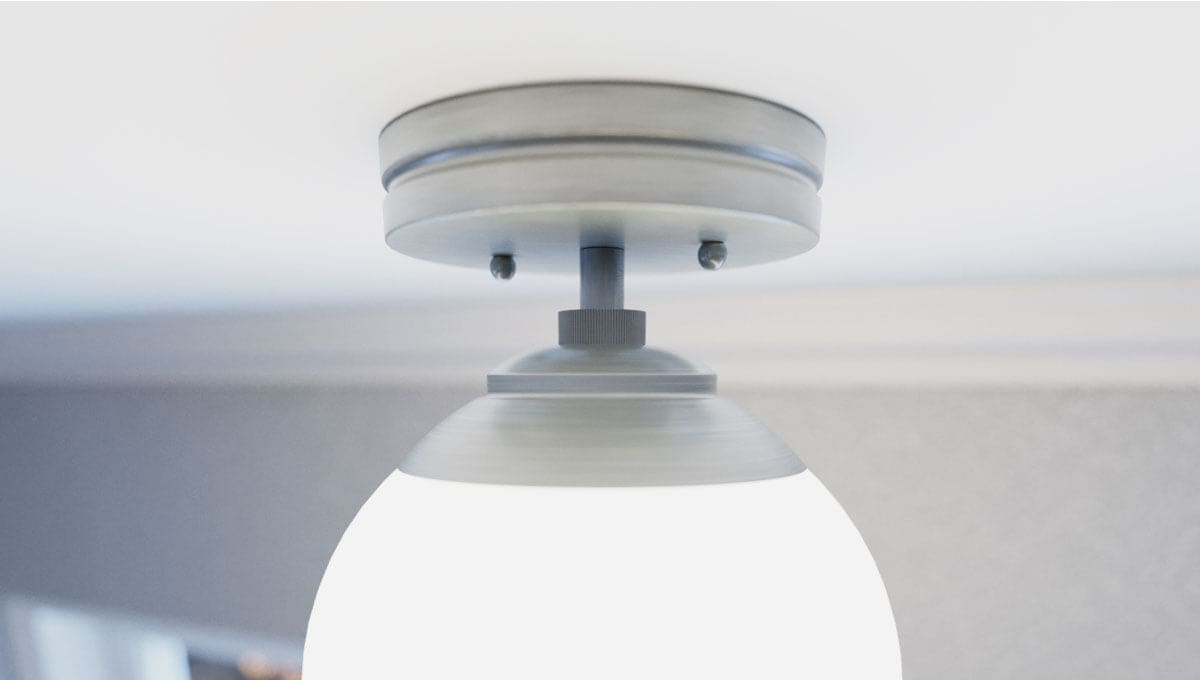
How to install flush mount lighting
There are two types of flush mount light fixtures: semi-flush mount and flush. Installing flush mount lighting versus semi-flush mount lighting installation varies slightly but one thing remains the same: Remove all parts when uninstalling the existing light fixture. You need to use the mounting bracket that comes with the new light fixture.
How to install a semi-flush mount light
Remember to safely uninstall and remove existing light fixtures first (see the related section at the top of this page). The below steps are a general guide for how to install your semi-flush mount light; always refer to your specific fixture’s manual for detailed instructions.
01. Assemble the fixture.
02. Insert mounting screws into the mounting bracket based on where they’ll align with the canopy.
03. Thread the fixture onto the mounting bracket assembly.
04. Install the mounting bracket to the junction box and pull the house wires through.
05. Use the included wire nuts to twist and connect the wires:
- Black to black (live wires)
- White to white (grounded)
- Grounding wire to grounding wire (these are usually green or copper)
- Secure the wire connections inside the junction box.
06. Loop the fixture’s grounding wire around the grounding screw and tighten.
07. Align the canopy holes with the mounting screws and secure with decorative cap nuts.
08. Add the finishing touches, making sure you have all the necessary accessories like votive covers and glass shades.
09. Be sure to use bulbs that do not exceed the maximum wattage listed on the socket.
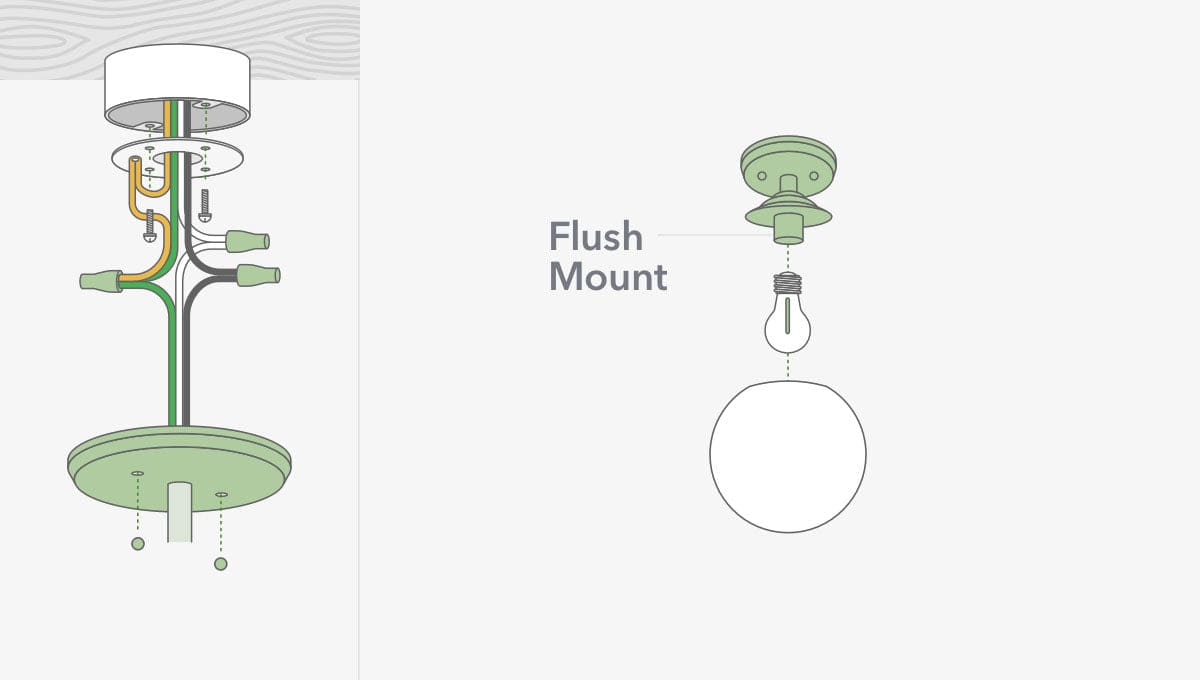
How to install a flush mount light
Remember to safely uninstall and remove existing light fixtures first (see the related section at the top of this page). The below steps are a general guide for how to install your flush mount light; always refer to your specific fixture’s manual for detailed instructions.
01. Insert mounting screws into the mounting bracket based on where they’ll align with the canopy.
02. Install the mounting bracket to the junction box and pull the house wires through.
03. Use the included wire nuts to twist and connect the wires:
- Black to black (live wires)
- White to white (grounded)
- Grounding wire to grounding wire (these are usually green or copper)
- Secure the wire connections inside the junction box.
04. Loop the fixture’s grounding wire around the grounding screw and tighten.
05. Align the canopy holes with the mounting screws and secure with decorative cap nuts.
06. Add the finishing touches, making sure you have all the necessary accessories like votive covers and glass shades.
07. Be sure to use bulbs that do not exceed the maximum wattage listed on the socket.
09.
How to install cluster pendant lights
Multiple pendants for one installation! That’s one appeal of cluster lighting: the individual pendants are connected to one fixture wiring system, so you only need one junction box. Cluster pendant lighting also gives you the control and creativity to adjust length of each pendant to fit your needs and style. Whether you install linear or round cluster pendant lights, make sure you remove everything from the existing light fixture and use the mounting plate that comes with your new light.
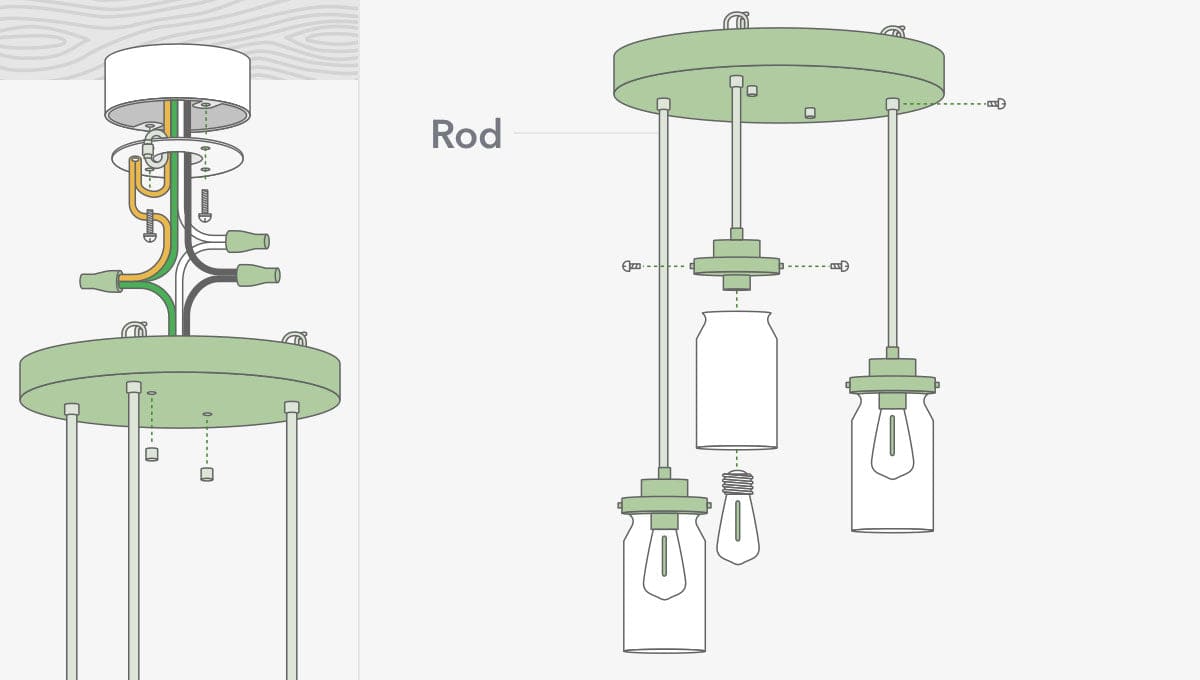
How to install round cluster lights
Remember to safely uninstall and remove existing light fixtures first (see the related section at the top of this page). The below steps are a general guide for how to install your round cluster pendant light; always refer to your specific fixture’s manual for detailed instructions.
01. Guide the house wires through the center of the mounting plate, then secure the plate to the junction box.
02. Slide a cord from each pendant through a grip in the canopy, adjusting each cord to your desired length. Use the included mini screwdriver to secure the cords by tightening the set screw.
03. Tie a knot in each cord above the canopy (this helps with strain relief).
04. Cut the excess cord but leave enough length from each to connect them to the center cord.
05. Remove the outer jacket of each cord to expose the individual white, black, and green wires. Strip half an inch from each wire.
06. Have someone hold the fixture while you wire the light. Use the included wire nuts to twist and connect the wires from all three cords to the house wires:
- Black to black (live wires)
- White to white (grounded)
- Grounding wire to grounding wire (these are usually green or copper)
- Secure the wire connections inside the junction box.
07. Loop the fixture’s grounding wire around the grounding screw and tighten.
08. Secure the canopy to the mounting plate with the decorative nuts.
09. Add the finishing touches, making sure you have all the necessary accessories like votive covers and glass shades.
10. Be sure to use bulbs that do not exceed the maximum wattage listed on the socket.
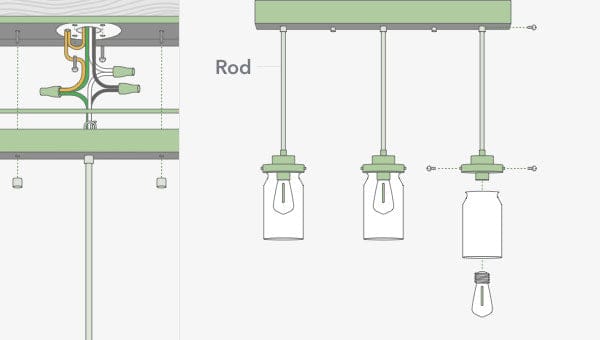
How to install linear cluster lights
Remember to safely uninstall and remove existing light fixtures first (see the related section at the top of this page). The below steps are a general guide for how to install your linear cluster pendant light; always refer to your specific fixture’s manual for detailed instructions.
01. Prep the mounting bracket. You may need to drill pilot holes; check your specific fixture’s manual for detailed instructions.
02. Guide the house wires through the center of the mounting plate, then secure the plate to the junction box.
03. Slide a cord from each pendant through a grip in the canopy. Use the included mini screwdriver to secure the cords by tightening the set screw.
04. Tie a knot in each cord above the canopy (this helps with strain relief).
05. Cut the excess cord, but leave enough length from each to connect them to the center cord.
06. Remove the outer jacket of each cord to expose the individual white, black, and green wires. Strip half an inch from each wire.
07. Have someone hold the fixture while you wire the light. Use the included wire nuts to twist and connect the wires from all three cords to the power supply from the junction box:
- Black to black (live wires)
- White to white (grounded)
- Grounding wire to grounding wire (these are usually green or copper)
- Secure the wire connections inside the junction box.
08. Loop the fixture’s grounding wire around the grounding screw and tighten.
09. Secure the canopy to the mounting plate with the decorative nuts.
10. Add the finishing touches, making sure you have all the necessary accessories like votive covers and glass shades.
11. Be sure to use bulbs that do not exceed the maximum wattage listed on the socket.